


Monday, December 9, 2013
Friday, December 6, 2013


Wednesday, December 4, 2013
25 Days Of Braids

Tuesday, September 17, 2013
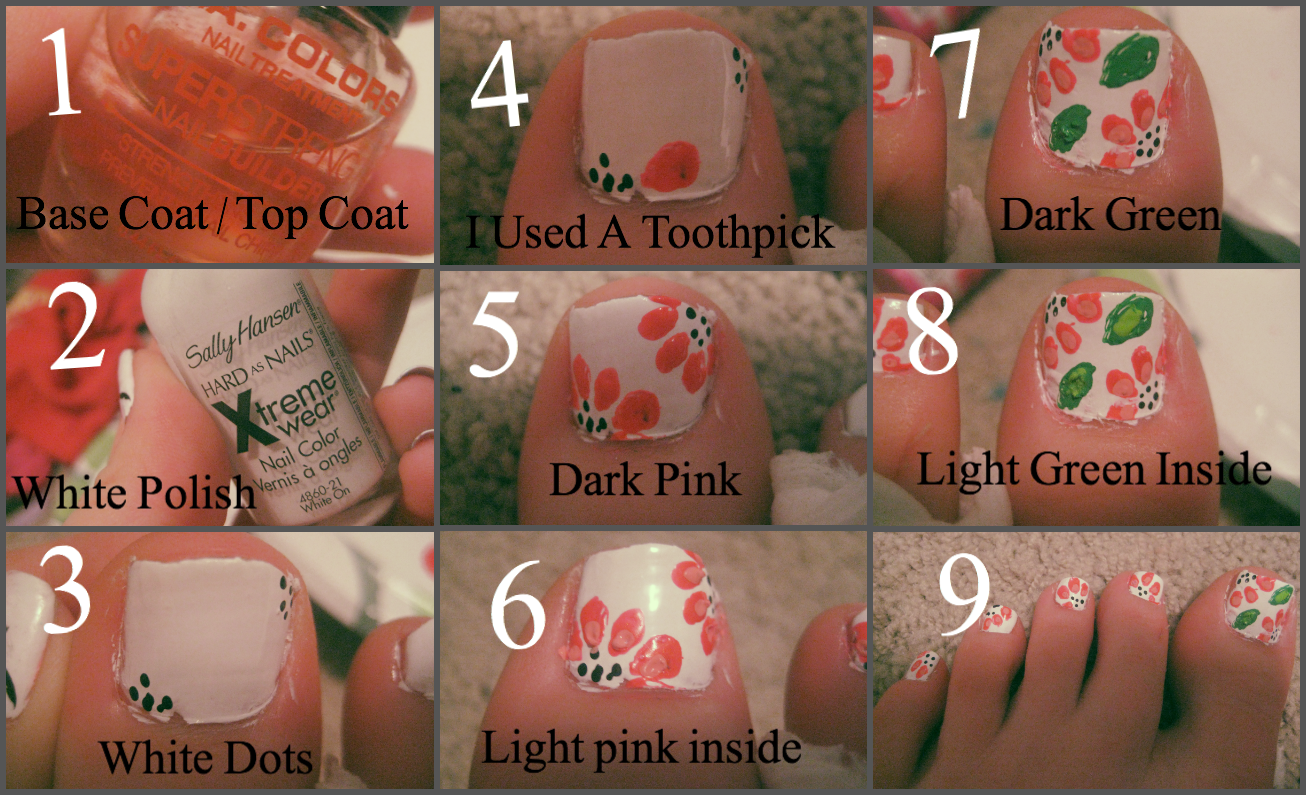
Vintage Floral Nails
Really have been having a bad month.. Never thought i would run out of tutorial ideas!! but its happening! I need you guys to comment ideas!! nails, Hair, Makeup, DIY's, Crafts, Ect.. :)
here is a FABULOUS Nail design that i have been LOVING! its a vintage Floral Nail design :)
I used a Light Pink, a Pale Green, And a darker Pink.


~Lydia~
Saturday, September 7, 2013
DIY Painted Light Switch Cover
This is an AWESOME and cute way you can jaz up your light switch cover!
Follow these pictures OR Make your own design :) (i used acrylic Paints)


Follow these pictures OR Make your own design :) (i used acrylic Paints)


Sunday, August 18, 2013
Easy And Simple Messy Bun
This is a REALLY simple and easy how to messy bun.. :) Hope you try it out!!

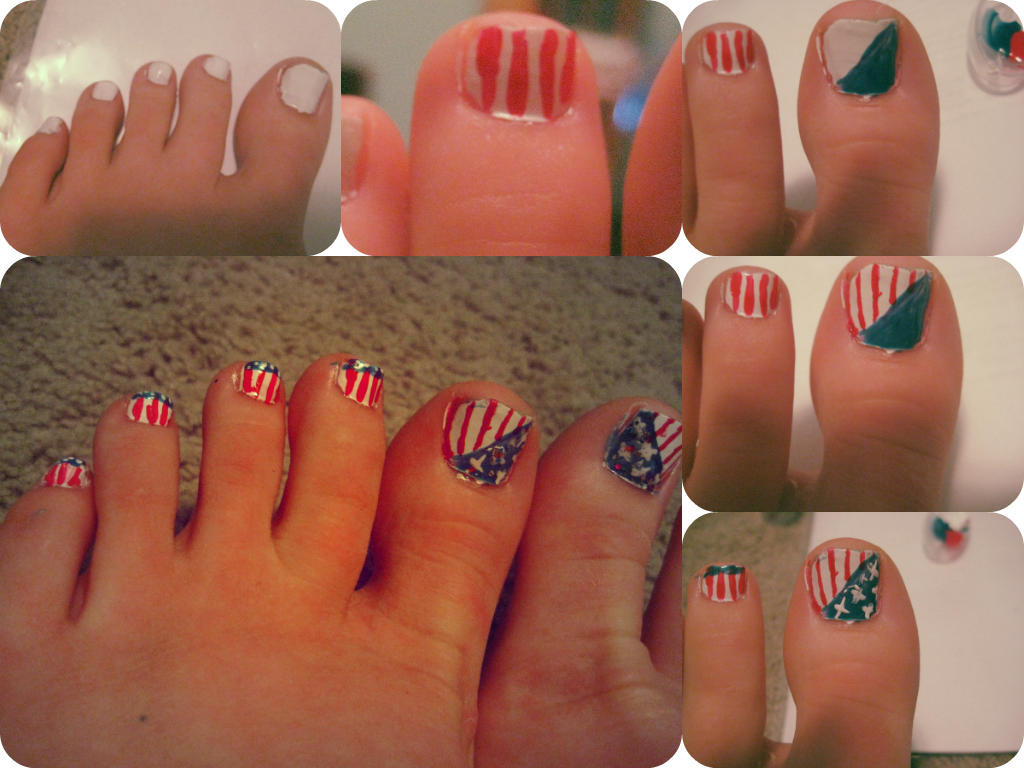
Thursday, July 4, 2013
'Merica Toes
This is super great for the 4th of july. but i'll be wearing these on my toes for a while :) Enjoy


1- Paint Your Toes white
2- paint red stripes on your toes except your Big toe
3- On your Big toe, Paint a blue stripe diagonally across and fill it in
4- Put red stripes on the rest of your big toe
5- paint a blue stripe across the top of all your little toes
6- Paint stars on anything that is blue!
And you're Done!! :)
Thursday, May 23, 2013
Summer Lovin' Toes!
I know i know.. its been forever since this girl has posted.. why isn't she posting.. i'm done..
I. am. SORRY!...
Here is a BEAUTIFUL to nail design That you (an your friends) will LOVE!!!
It makes your feet look.. cute!! (feet? being cute? ya right Lydia.....) But really!!! Just look!!!

Yeah!! I TOLD YOU SOO!!!!!! Now.. no more talking.. Lets get down to business!
Here is what you need to do!!
now get going and get those toe nails done so you can show em off!!!! :D

Thursday, May 16, 2013
8th Grade Formal Hair
So my 8th grade Friends had an 8th grade formal to go to this thursday.. so i did their hair for it!! i am in 9th grade.. plus i am home schooled so i don't go to dances unless i get asked to prom.. which i did.. but i didn't go.. :P
Here is Kiara's Hair.. 3 french Braids into a bun <3


here is Shelby's... 3 Buns.. 2 with french braids on the sides then the top bun just twisted back :)


here is Katie's.... it. is. BEAUTIFUL!!! Its a side braid with another small side braid on the other side and the 2 braids folded in and pinned!! <3


Like always.. if you would like a tutorial on either of these (1, 2 or 3) email me at Mysteriouslygorgeous13@gmail.com or comment. and i will try my best to make it happen!!
Tuesday, May 14, 2013
7 Days Of Braids
If you like any of these braids and would like a tutorial.. comment or email me. Information in a page above <3 :)
Day One- Corn Rows

Day 2- Bohemian Braids

Day 3- Katnis Braid

Day 4- Double Dutch

Day 5- Waterfall

Day 6- French Dutch Braid Pony

Day 7- Upside Down French Braided bun

Dutch Braided like Whoa
This braided style Has no name.. comment if you have any name ideas for this braided style!!


Thursday, May 2, 2013
Triple Dutch Braid Fall
Hey Girls!, So this is kinda a "fake shaved head" But its soooo cute! i was just sitting infront of my mirror and i came up with this Hair Style. you can either to a regular braid or a Dutch braid.. it is a French braid so you add hair.. but we are only adding hair from the top and not the bottom.. scroll down to learn how to create this adorable hair style <3


2-Tie back the rest of your hair

3- Take a small section from the top of your section parted off

4- Start French braiding pointing the hair up and back(or dutch french braiding) ONLY ADDING HAIR FROM THE TOP. NOT THE BOTTOM

5- Continue this process and tie with a small elastic band

6- Do it again to a section below it

7- And a third time

8- This is what it should look like when you are done

9- Leave it as is.. or pull back..

10- And Pin.. one pin going up and one going down for a secure hold.

If you try this please send me a picture at
mysteriouslygorgeous13@gmail.com


Subscribe to:
Posts (Atom)